This blog provides an example for deploying a CI/CD pipeline on AWS utilising the serverless container platform Fargate and the fully managed CodePipeline service. We’ll also use Terraform to automate the process for building the entire AWS environment, as shown in the below diagram.
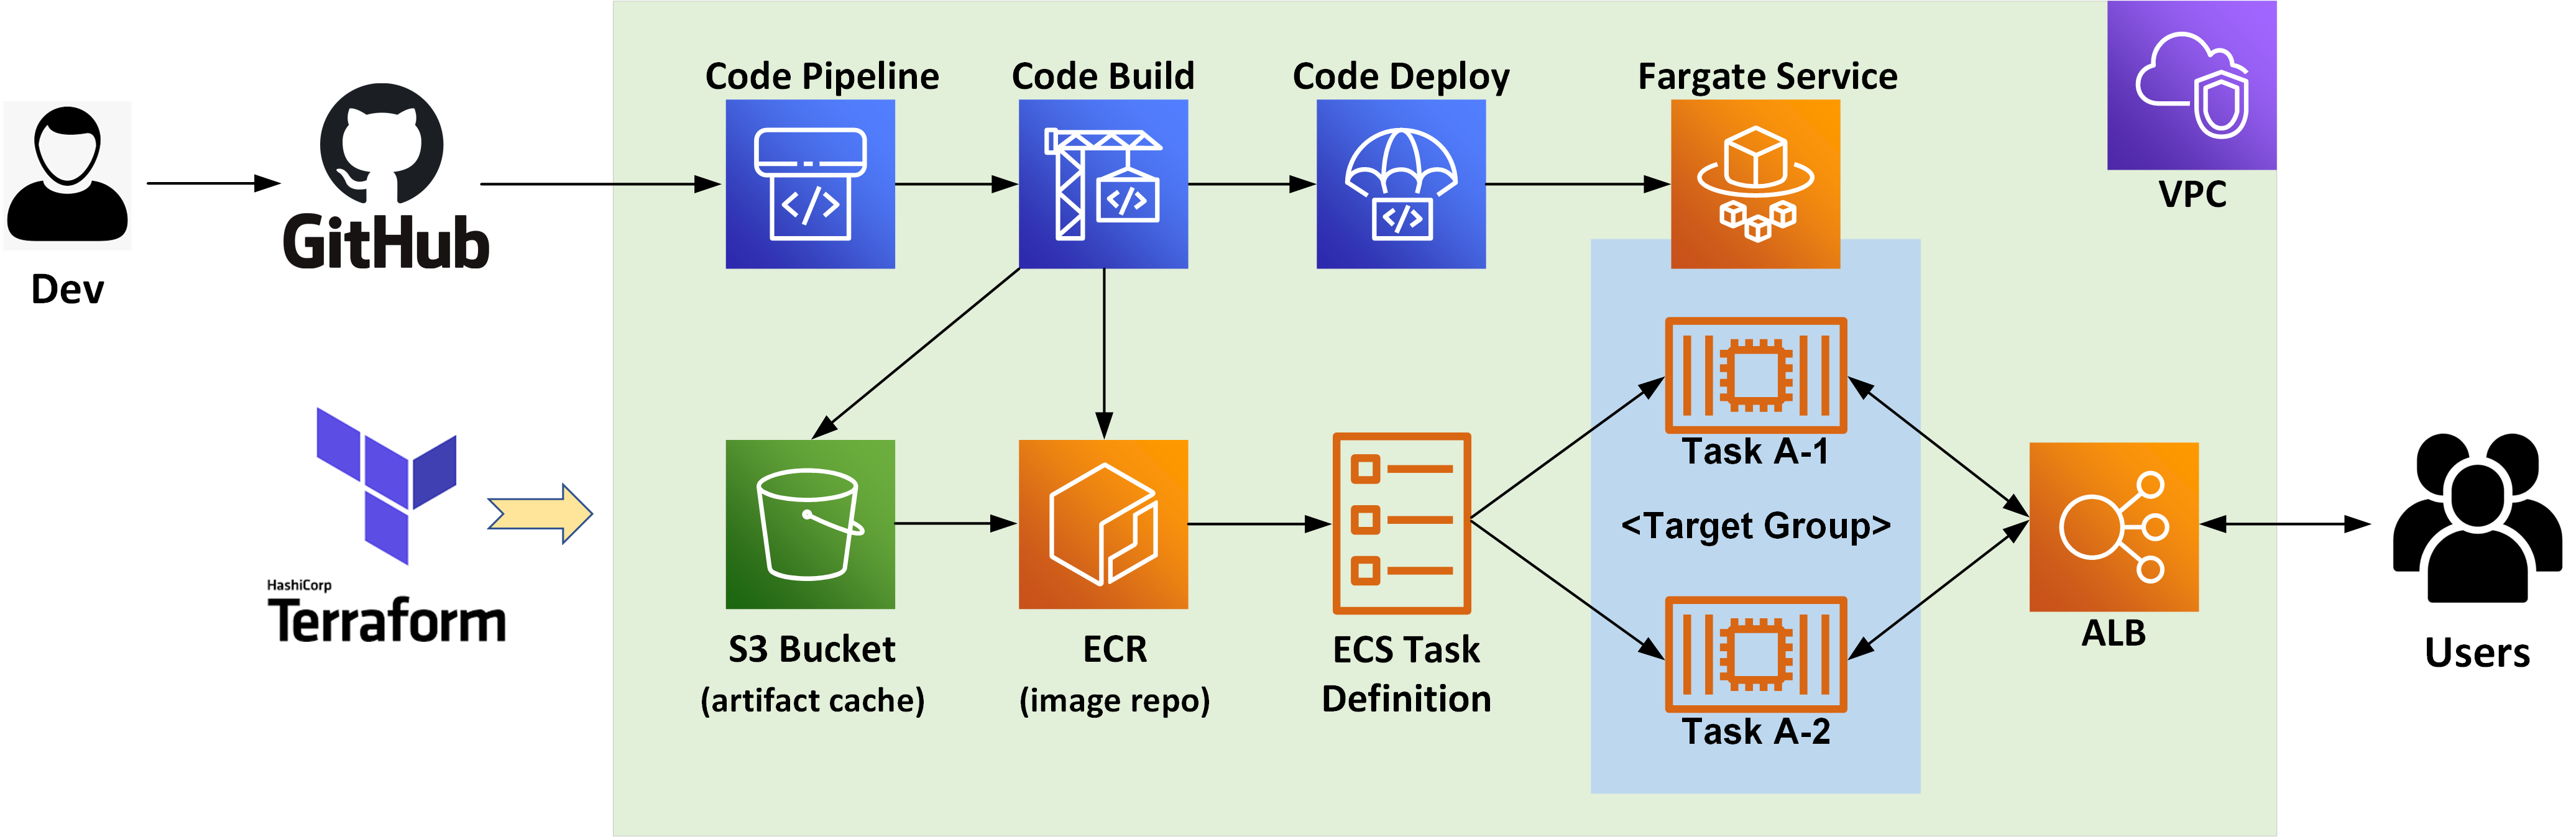
Specifically, we’ll be creating the following AWS resources:
- 1x demo VPC including public/private subnets, NAT gateway and security groups etc
- 1x ALB for providing LB services to a target group of 2x Fargate container tasks
- 1x ECS cluster with a Fargate service definition (running our demo app)
- 1x CodePipeline definition, which builds the demo app from GitHub Repo (with a webhook trigger) and deploys it to the same Fargate service
- 1x ECR repository for hosting pipeline build images
- 2x S3 Buckets as build & artifact cache
References – for this demo, I’m using these Terraform modules found on GitHub:
- Tmknom Terraform Module for creating AWS ECS Fargate
- CloudPosse Terraform Module for creating AWS CodePipeline on ECS Infrastructure
PREREQUISITES
- Access to an AWS testing environment
- Install Git & Terraform on your client
- Install AWS toolkits including AWS CLI, AWS-IAM-Authenticator
- Check the NTP clock & sync status on your client —> important!
- Clone or donwload the Terraform code at here.
- Clone or fork the demo app (including CodePipeline buildspec) at here.
Step-1: Review the Terraform Script
Let’s take a close look of the Terraform code. I’ll skip the VPC and ALB sections and focus on the ECS/Fargate service and CodePipeline definition.
This section creates an ECS cluster with the Fargate service definition, note I have put a bitnami node image for testing purpose and it will get replaced automatically by our demo app via the CodPipeline execution.
############################# Create ECS Cluster and Fargate Service ##################################


resource "aws_ecs_cluster" "ecs_cluster" {
  name = "default"
}


module "ecs_fargate" {
  source           = "git::https://github.com/tmknom/terraform-aws-ecs-fargate.git?ref=tags/2.0.0"
  name             = var.ecs_service_name
  container_name   = var.container_name
  container_port   = var.container_port
  cluster          = aws_ecs_cluster.ecs_cluster.arn
  subnets          = module.vpc.public_subnets
  target_group_arn = join("", module.alb.target_group_arns)
  vpc_id           = module.vpc.vpc_id

  container_definitions = jsonencode([
    {
      name      = var.container_name
      image     = "bitnami/node:latest"
      essential = true
      portMappings = [
        {
          containerPort = var.container_port
          protocol      = "tcp"
        }
      ]
    }
  ])

  desired_count                      = 2
  deployment_maximum_percent         = 200
  deployment_minimum_healthy_percent = 100
  deployment_controller_type         = "ECS"
  assign_public_ip                   = true
  health_check_grace_period_seconds  = 10
  platform_version                   = "LATEST"
  source_cidr_blocks                 = ["0.0.0.0/0"]
  cpu                                = 256
  memory                             = 512
  requires_compatibilities           = ["FARGATE"]
  iam_path                           = "/service_role/"
  description                        = "Fargate demo example"
  enabled                            = true

  tags = {
    Environment = "Dev"
  }
}
This section creates an ECR repository (for hosting the build image) and defines the pipeline, which builds the demo app from GitHub repo, pushes the new image to ECR and deploys it to the same ECS cluster and Fargate service as created from the above.
################################### Create ECR Repo and Code Pipeline ###################################


resource "aws_ecr_repository" "fargate-repo" {
  name = var.ecr_repo

  image_scanning_configuration {
    scan_on_push = true
  }
}

module "ecs_codepipeline" {
  source                = "git::https://github.com/cloudposse/terraform-aws-ecs-codepipeline.git?ref=master"
  name                  = var.app_name
  namespace             = var.namespace
  region                = var.region
  image_repo_name       = var.ecr_repo
  stage                 = var.stage
  github_oauth_token    = var.github_oath_token
  github_webhooks_token = var.github_webhooks_token
  webhook_enabled       = "true"
  repo_owner            = var.github_repo_owner
  repo_name             = var.github_repo_name
  branch                = "master"
  service_name          = module.ecs_fargate.ecs_service_name
  ecs_cluster_name      = aws_ecs_cluster.ecs_cluster.arn
  privileged_mode       = "true"
}
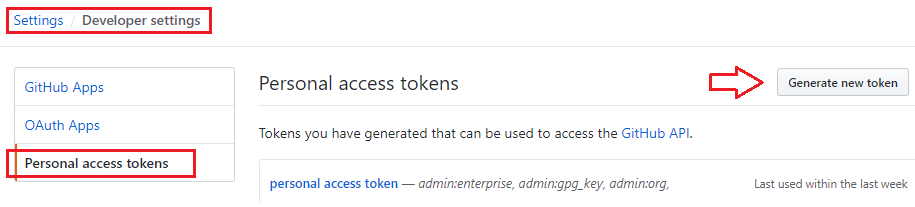
Note the pipeline is synced to GitHub with a webhook trigger enabled, and you’ll need to supply a GitHub personal token for this. So go create one if you haven’t already done so.
Step-2: Create the Serverless Pipeline with Terraform
Configure AWS environment variables
[root@cloud-ops01 tf-aws-eks]# aws configure
AWS Access Key ID [*****]:
AWS Secret Access Key [***]:
Default region name [us-east-1]:
Default output format [json]:
update terraform.tfvars based on your own environment
region = "us-east-1"
ecs_service_name = "ecs-svc-example"
container_port = 3000
container_name = "demo-app"
namespace = "xxx"
stage = "dev"
app_name = "demo-app-xxxx"
ecr_repo = "fargate-demo-repo"
github_oath_token = "xxxx"
github_webhooks_token = "xxxx"
github_repo_owner = "xxxx"
github_repo_name = "fargate-demo-app"
Now run the Terraform script
terraform init
terraform apply
The process will take about 5 mins and you should see an output like this. Note the public URL of the ALB, which is providing LB services to the 2x Fargate container tasks.

Step-3: Review the Fargate Service
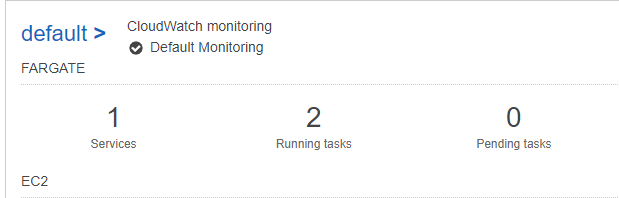
On the AWS Console, go to “Elastic Container Service (ECS) —> Cluster” and we can see an ECS cluster “default” has been created, with 1x Fargate service defined and 2x container tasks/pods running.
and here are the two running container tasks/pods:
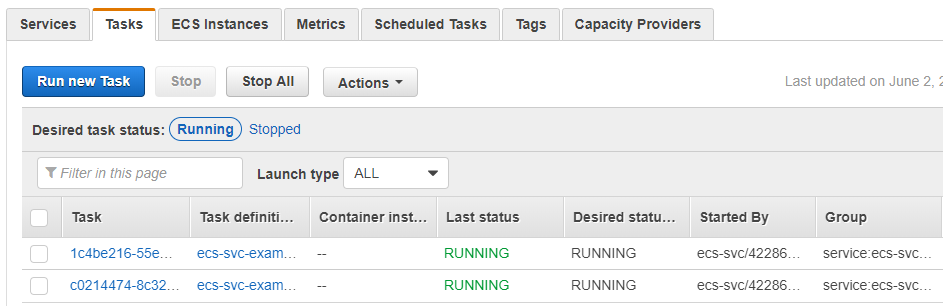
Click any of the tasks to confirm its running our demo app image deployed from the ECR repository.

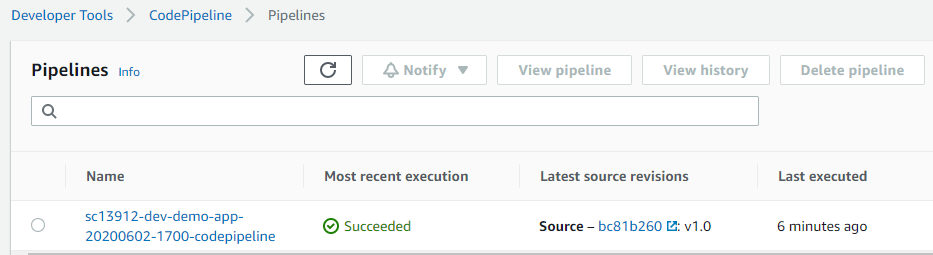
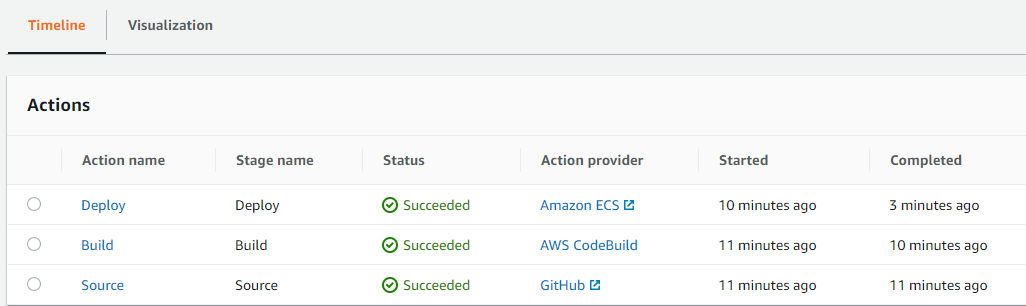
Next, search for AWS service “Developer Tools —> CodePipeline“, you’ll see our Pipeline has been deployed with a (1st) successful execution.
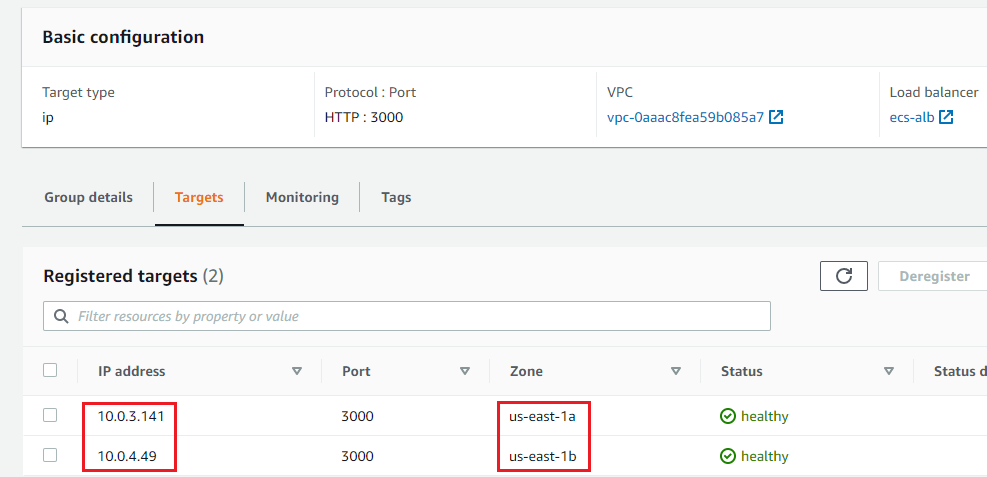
Now search for “EC2 —> Load Balancer”, confirm that an ALB has been created and it should be deployed on two different subsets across two AZs.
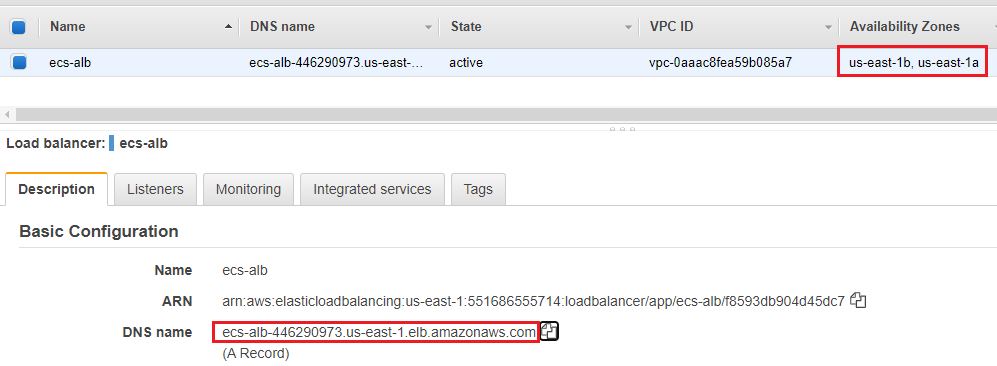
This is because we are spreading the 2x ECS container tasks onto two AZs for high availability
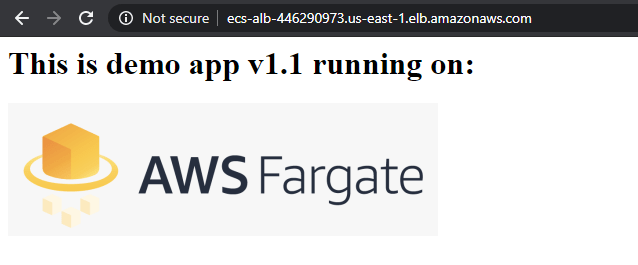
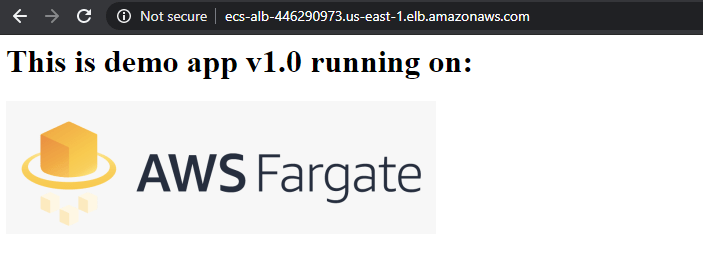
Go to the ALB public DNS/URL and you should see the default page of our demo app running on AWS Fargate, cool!
Step-4: Test the Pipeline Run
It’s testing time now! As discussed, the pipeline is synced to Github repository and will be triggered by a push to master event. The actual build task is defined within the buildspec.yaml which contains a simple 3-stage process as per below. Note the output of the build process includes a json artifact (imagedefinitions.json) which includes the ECR path for the latest build image.
version: 0.2
phases:
  pre_build:
    commands:
      - echo Logging in to Amazon ECR...
      - aws --version
      - eval $(aws ecr get-login --region $AWS_DEFAULT_REGION --no-include-email)
      - REPOSITORY_URI=$AWS_ACCOUNT_ID.dkr.ecr.$AWS_REGION.amazonaws.com/$IMAGE_REPO_NAME
      - IMAGE_TAG=$(echo $CODEBUILD_RESOLVED_SOURCE_VERSION | cut -c 1-7)
  build:
    commands:
      - echo Build started on `date`
      - echo Building the Docker image...
      - REPO_URI=$AWS_ACCOUNT_ID.dkr.ecr.$AWS_REGION.amazonaws.com/$IMAGE_REPO_NAME
      - docker pull $REPO_URI:latest || true
      - docker build --cache-from $REPO_URI:latest --tag $REPO_URI:latest --tag $REPO_URI:$IMAGE_TAG .
  post_build:
    commands:
      - echo Build completed on `date`
      - echo Pushing the Docker images...
      - REPO_URI=$AWS_ACCOUNT_ID.dkr.ecr.$AWS_REGION.amazonaws.com/$IMAGE_REPO_NAME
      - docker push $REPO_URI:latest
      - docker push $REPO_URI:$IMAGE_TAG
      - echo Writing image definitions file...
      - printf '[{"name":"demo-app","imageUri":"%s"}]' "$REPO_URI:$IMAGE_TAG" | tee imagedefinitions.json
artifacts:
  files: imagedefinitions.json
To test the pipeline run, we’ll make a “cosmetic change” to the app revision (v1.0 —> v1.1)

Commit and push to master.
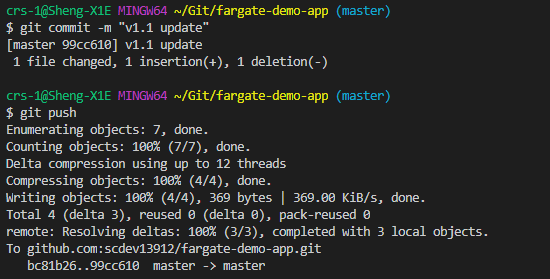
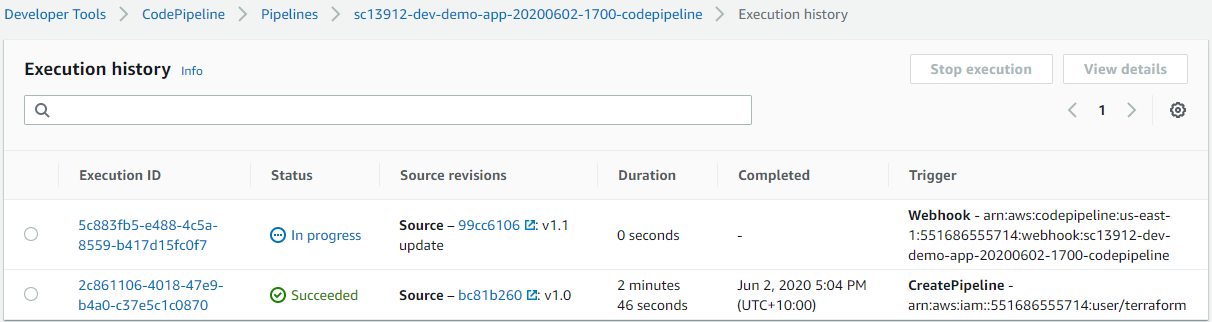
As expected, this has triggered a new pipeline run
Soon you’ll see two additional pods are launching with a new revision number of “3” — this is because by default Fargate implements a rolling update deployment strategy with a default minimum healthy percent of 100%. So it will not remove the previous container pods (revision 2) until the new ones are running and ready.
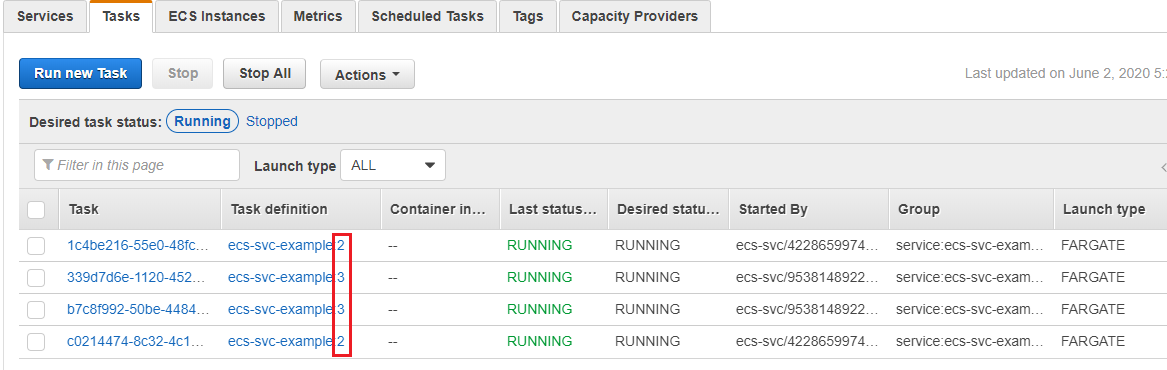
Once the v3 Pods are running and we can see the v2 pods are being terminated and de-registered from the service.

Eventually the v2 pods are removed and the Fargate service is now updated with revision 3, which consists of the new pods running our demo app “v1.1”.

In the CodePipeline history, verify the new build & deployment process have been completed successfully.
Also, verify the new image (tag “99cc610”) of the demo app is pushed to ECR as expected.

Go to the Fargate tasks (revision 3) again and verify the container pods are indeed running on the new image “99cc610”.

Refresh the ALB address to see the v1.1 app page loading — Magic!