Build a Serverless CI/CD pipeline on AWS with Fargate, CodePipeline and Terraform

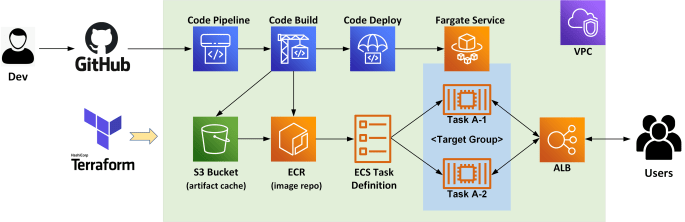
This blog provides an example for deploying a CI/CD pipeline on AWS utilising the serverless container platform Fargate and the fully managed CodePipeline service. We’ll also use Terraform to automate the process for building the entire AWS environment, as shown in the below diagram.

Specifically, we’ll be creating the following AWS resources:

  • 1x demo VPC including public/private subnets, NAT gateway and security groups etc
  • 1x ALB for providing LB services to a target group of 2x Fargate container tasks
  • 1x ECS cluster with a Fargate service definition (running our demo app)
  • 1x CodePipeline definition, which builds the demo app from GitHub Repo (with a webhook trigger) and deploys it to the same Fargate service
  • 1x ECR repository for hosting pipeline build images
  • 2x S3 Buckets as build & artifact cache

References – for this demo, I’m using these Terraform modules found on GitHub:

PREREQUISITES

  • Access to an AWS testing environment
  • Install Git & Terraform on your client
  • Install AWS toolkits including AWS CLI, AWS-IAM-Authenticator
  • Check the NTP clock & sync status on your client —> important!
  • Clone or donwload the Terraform code at here.
  • Clone or fork the demo app (including CodePipeline buildspec) at here.

Step-1: Review the Terraform Script

Let’s take a close look of the Terraform code. I’ll skip the VPC and ALB sections and focus on the ECS/Fargate service and CodePipeline definition.

This section creates an ECS cluster with the Fargate service definition, note I have put a bitnami node image for testing purpose and it will get replaced automatically by our demo app via the CodPipeline execution.

############################# Create ECS Cluster and Fargate Service ##################################


resource "aws_ecs_cluster" "ecs_cluster" {
  name = "default"
}


module "ecs_fargate" {
  source           = "git::https://github.com/tmknom/terraform-aws-ecs-fargate.git?ref=tags/2.0.0"
  name             = var.ecs_service_name
  container_name   = var.container_name
  container_port   = var.container_port
  cluster          = aws_ecs_cluster.ecs_cluster.arn
  subnets          = module.vpc.public_subnets
  target_group_arn = join("", module.alb.target_group_arns)
  vpc_id           = module.vpc.vpc_id

  container_definitions = jsonencode([
    {
      name      = var.container_name
      image     = "bitnami/node:latest"
      essential = true
      portMappings = [
        {
          containerPort = var.container_port
          protocol      = "tcp"
        }
      ]
    }
  ])

  desired_count                      = 2
  deployment_maximum_percent         = 200
  deployment_minimum_healthy_percent = 100
  deployment_controller_type         = "ECS"
  assign_public_ip                   = true
  health_check_grace_period_seconds  = 10
  platform_version                   = "LATEST"
  source_cidr_blocks                 = ["0.0.0.0/0"]
  cpu                                = 256
  memory                             = 512
  requires_compatibilities           = ["FARGATE"]
  iam_path                           = "/service_role/"
  description                        = "Fargate demo example"
  enabled                            = true

  tags = {
    Environment = "Dev"
  }
}

This section creates an ECR repository (for hosting the build image) and defines the pipeline, which builds the demo app from GitHub repo, pushes the new image to ECR and deploys it to the same ECS cluster and Fargate service as created from the above.

################################### Create ECR Repo and Code Pipeline ###################################


resource "aws_ecr_repository" "fargate-repo" {
  name = var.ecr_repo

  image_scanning_configuration {
    scan_on_push = true
  }
}

module "ecs_codepipeline" {
  source                = "git::https://github.com/cloudposse/terraform-aws-ecs-codepipeline.git?ref=master"
  name                  = var.app_name
  namespace             = var.namespace
  region                = var.region
  image_repo_name       = var.ecr_repo
  stage                 = var.stage
  github_oauth_token    = var.github_oath_token
  github_webhooks_token = var.github_webhooks_token
  webhook_enabled       = "true"
  repo_owner            = var.github_repo_owner
  repo_name             = var.github_repo_name
  branch                = "master"
  service_name          = module.ecs_fargate.ecs_service_name
  ecs_cluster_name      = aws_ecs_cluster.ecs_cluster.arn
  privileged_mode       = "true"
}

Note the pipeline is synced to GitHub with a webhook trigger enabled, and you’ll need to supply a GitHub personal token for this. So go create one if you haven’t already done so.

This image has an empty alt attribute; its file name is image.png

Step-2: Create the Serverless Pipeline with Terraform

Configure AWS environment variables

[root@cloud-ops01 tf-aws-eks]# aws configure
AWS Access Key ID [*****]: 
AWS Secret Access Key [***]: 
Default region name [us-east-1]: 
Default output format [json]:

update terraform.tfvars based on your own environment

region = "us-east-1"
ecs_service_name = "ecs-svc-example"
container_port = 3000
container_name = "demo-app"
namespace = "xxx"
stage = "dev"
app_name = "demo-app-xxxx"
ecr_repo = "fargate-demo-repo"
github_oath_token = "xxxx"
github_webhooks_token = "xxxx"
github_repo_owner = "xxxx"
github_repo_name = "fargate-demo-app"

Now run the Terraform script

terraform init
terraform apply

The process will take about 5 mins and you should see an output like this. Note the public URL of the ALB, which is providing LB services to the 2x Fargate container tasks.

Step-3: Review the Fargate Service

On the AWS Console, go to “Elastic Container Service (ECS) —> Cluster” and we can see an ECS cluster “default” has been created, with 1x Fargate service defined and 2x container tasks/pods running.

and here are the two running container tasks/pods:

Click any of the tasks to confirm its running our demo app image deployed from the ECR repository.

Next, search for AWS service “Developer Tools —> CodePipeline“, you’ll see our Pipeline has been deployed with a (1st) successful execution.

Now search for “EC2 —> Load Balancer”, confirm that an ALB has been created and it should be deployed on two different subsets across two AZs.

This is because we are spreading the 2x ECS container tasks onto two AZs for high availability

Go to the ALB public DNS/URL and you should see the default page of our demo app running on AWS Fargate, cool!

Step-4: Test the Pipeline Run

It’s testing time now! As discussed, the pipeline is synced to Github repository and will be triggered by a push to master event. The actual build task is defined within the buildspec.yaml which contains a simple 3-stage process as per below. Note the output of the build process includes a json artifact (imagedefinitions.json) which includes the ECR path for the latest build image.

version: 0.2
phases:
  pre_build:
    commands:
      - echo Logging in to Amazon ECR...
      - aws --version
      - eval $(aws ecr get-login --region $AWS_DEFAULT_REGION --no-include-email)
      - REPOSITORY_URI=$AWS_ACCOUNT_ID.dkr.ecr.$AWS_REGION.amazonaws.com/$IMAGE_REPO_NAME
      - IMAGE_TAG=$(echo $CODEBUILD_RESOLVED_SOURCE_VERSION | cut -c 1-7)
  build:
    commands:
      - echo Build started on `date`
      - echo Building the Docker image...
      - REPO_URI=$AWS_ACCOUNT_ID.dkr.ecr.$AWS_REGION.amazonaws.com/$IMAGE_REPO_NAME
      - docker pull $REPO_URI:latest || true
      - docker build --cache-from $REPO_URI:latest --tag $REPO_URI:latest --tag $REPO_URI:$IMAGE_TAG .
  post_build:
    commands:
      - echo Build completed on `date`
      - echo Pushing the Docker images...
      - REPO_URI=$AWS_ACCOUNT_ID.dkr.ecr.$AWS_REGION.amazonaws.com/$IMAGE_REPO_NAME
      - docker push $REPO_URI:latest
      - docker push $REPO_URI:$IMAGE_TAG
      - echo Writing image definitions file...
      - printf '[{"name":"demo-app","imageUri":"%s"}]' "$REPO_URI:$IMAGE_TAG" | tee imagedefinitions.json
artifacts:
  files: imagedefinitions.json

To test the pipeline run, we’ll make a “cosmetic change” to the app revision (v1.0 —> v1.1)

Commit and push to master.

As expected, this has triggered a new pipeline run

Soon you’ll see two additional pods are launching with a new revision number of “3” — this is because by default Fargate implements a rolling update deployment strategy with a default minimum healthy percent of 100%. So it will not remove the previous container pods (revision 2) until the new ones are running and ready.

Once the v3 Pods are running and we can see the v2 pods are being terminated and de-registered from the service.

Eventually the v2 pods are removed and the Fargate service is now updated with revision 3, which consists of the new pods running our demo app “v1.1”.

In the CodePipeline history, verify the new build & deployment process have been completed successfully.

Also, verify the new image (tag “99cc610”) of the demo app is pushed to ECR as expected.

Go to the Fargate tasks (revision 3) again and verify the container pods are indeed running on the new image “99cc610”.

Refresh the ALB address to see the v1.1 app page loading — Magic!

Cloud Native DevOps on GCP Series Ep3 – Use Terraform to launch a Serverless CI/CD pipeline with Cloud Run, GCR and Cloud Build

This is the third episode of our Cloud Native DevOps on GCP series. In the previous chapters, we have achieved the following:

This time, we will take a step further and go completely serverless by deploying the same Node app onto the Google Cloud Run platform. Cloud Run is built from an open source project named Knative, which is a serverless framework developed based on the industry proven Kubernetes architecture. Whilst Knative is developed with the same event-driven concept (like other serverless solutions), it also offers great flexibility and multi-cloud portability at a container level.

For this demo, we will firstly launch a Cloud Run Service with an initial image using cloudrun-hello app provided by Google. We will also create a Cloud Build Pipeline to automatically build and push our Node app onto GCR, and then deploy it to the same Cloud Run Service (as a new revision). As previously, the pipeline will be synced to GitHub repository and automatically triggered by a Git push event.

Best of all, all GCP resources in this environment, including the Cloud Run Service and the Cloud Build Pipeline will be provisioned via Terraform, as illustrated at below.

WHAT YOU’LL NEED:

  • Access to a GCP testing environment
  • Install Git and Terrafrom on your client
  • Install GCloud SDK
  • Check the NTP clock & sync status on your client —> important!
  • Clone or download the Terraform script at here
  • Clone or fork the NodeJS demo app at here

Step-1: Prepare the GCloud Environment

To start, configure the GCloud environment variables and authentications.

gcloud init
gcloud config set accessibility/screen_reader true
gcloud auth application-default login

Enable required GCP API services

gcloud services enable servicenetworking.googleapis.com
gcloud services enable cloudresourcemanager.googleapis.com
gcloud services enable cloudbuild.googleapis.com
gcloud services enable containerregistry.googleapis.com 
gcloud services enable run.googleapis.com 
gcloud services enable sourcerepo.googleapis.com    

Update Cloud Build service account with all the necessary roles so it will have required permissions to access Cloud Run and GCR within the project.

PROJECT_ID=`gcloud config get-value project`
CLOUDBUILD_SA="$(gcloud projects describe $PROJECT_ID --format 'value(projectNumber)')@cloudbuild.gserviceaccount.com"
gcloud projects add-iam-policy-binding $PROJECT_ID --member serviceAccount:$CLOUDBUILD_SA --role roles/editor
gcloud projects add-iam-policy-binding $PROJECT_ID --member serviceAccount:$CLOUDBUILD_SA --role roles/run.admin
gcloud projects add-iam-policy-binding $PROJECT_ID --member serviceAccount:$CLOUDBUILD_SA --role roles/container.developer

Step-2: Connect Cloud Build to GitHub Repository

Next, let’s connect Cloud Build to the demo app Git Repository. On GCP console, go to “Cloud Build —> Triggers —> Connect Repository” and then select “GitHub” as below. (You will be redirected to GitHub for authentication.)

Select the demo app repository which contains the sample NodeJs application.

In the next page, make sure to click “Skip for now” and we are done. We’ll leave it to Terraform to create the trigger at later.

Step-3: Run Terrafrom Script to launch a Serverless CI/CD Pipeline

Before executing the script, make sure to update the variables (as defined in Terrafrom.tfvars) as per your own GCP environment.

project_id = "xxxxxxxx"
location = "asia-northeast1"
gcr_region = "asia"
github_owner = "xxxxxx"
github_repository = "xxxxxx"

Run the Terraform script.

terraform init
terraform apply

Since we are not provisioning any Infrastructure resources (it’s Serverless!), the process should take less than 2~3 mins. Take a note of the URL provided in the output — this is the public URL of our Cloud Run Service.

On GCP console verify the Cloud Run Service has been deployed successfully.

Now go to the above URL and you should see the default page of the cloudrun-hello app.

Before we move forward, confirm there is now a Cloud Build triggered provisioned by Terrafrom with the pipeline config defined as “cloudbuild.yaml“.

Step-4: Test the Pipeline

Now let’s take a closer look at the pipeline code. This is a basic 3-stage pipeline:

  • Build the demo Node app
  • Push the image to GCR
  • Deploy the image from GCR to the existing Cloud Run Service
steps:
  # Build Node app docker image
  - name: "gcr.io/cloud-builders/docker"
    args:
      - build
      - -t
      - ${_GCR_REGION}.gcr.io/$PROJECT_ID/${_SERVICE_NAME}:$COMMIT_SHA
      - .

  # Push Node app image to GCR
  - name: "gcr.io/cloud-builders/docker"
    args:
      - push 
      - ${_GCR_REGION}.gcr.io/$PROJECT_ID/${_SERVICE_NAME}:$COMMIT_SHA

  # Deploy the docker image to Cloud Run Service
  - name: "gcr.io/cloud-builders/gcloud"
    args:
      - run
      - deploy
      - ${_SERVICE_NAME}
      - --image=${_GCR_REGION}.gcr.io/$PROJECT_ID/${_SERVICE_NAME}:$COMMIT_SHA
      - --region=${_LOCATION}
      - --platform=managed

images:
  - "${_GCR_REGION}.gcr.io/$PROJECT_ID/${_SERVICE_NAME}:$COMMIT_SHA"

timeout: 1200s
substitutions:
  _LOCATION: asia-northeast1 
  _GCR_REGION: asia 
  _SERVICE_NAME: cloudrun-demo

Time to test the pipeline! We’ll add a note into the README file.

Commit and push to Git.

This should automatically trigger the pipeline, and the 3-stage process should be completed around a minute 🙂

Now go back to our Cloud Run Service, you should see a new revision has been deployed by Cloud Build, with the container image now pointing to the GCR path (which contains our demo app).

Refresh the browser and Boom — you now have access to the demo app running on Google Cloud Run!

This concludes our Cloud Native DevOps on GCP series. I hope this has been informative and thanks very much for reading!